AI Powered Coding and Deployment
Building the Ultimate AI-Powered Development Workflow: From Issue to Production in Minutes
How I built a fully automated development & deployment pipeline where Claude AI can fix bugs and Github actions create preview environments. All from a GitHub issue that I can create and manage from my phone.
The Problem: When Product Manager Meets Developer
As a product manager who writes code, I live in two worlds. In one, I’m all over user feedback and prioritizing features. In the other, I’m knee-deep in code. The constant context switching is exhausting and as I want more partners to work on the project I need better tools.
While working on Canvas Genie (my AI-powered whiteboard tool), I found myself spending hours on repetitive tasks:
- Manually creating branches for bug fixes
- Setting up test environments (locally testing the change)
- Coordinating deployments
That’s when it hit me: What if AI could handle the entire flow from bug report to deployed fix?
The Vision: AI as a True Team Member
Imagine this scenario: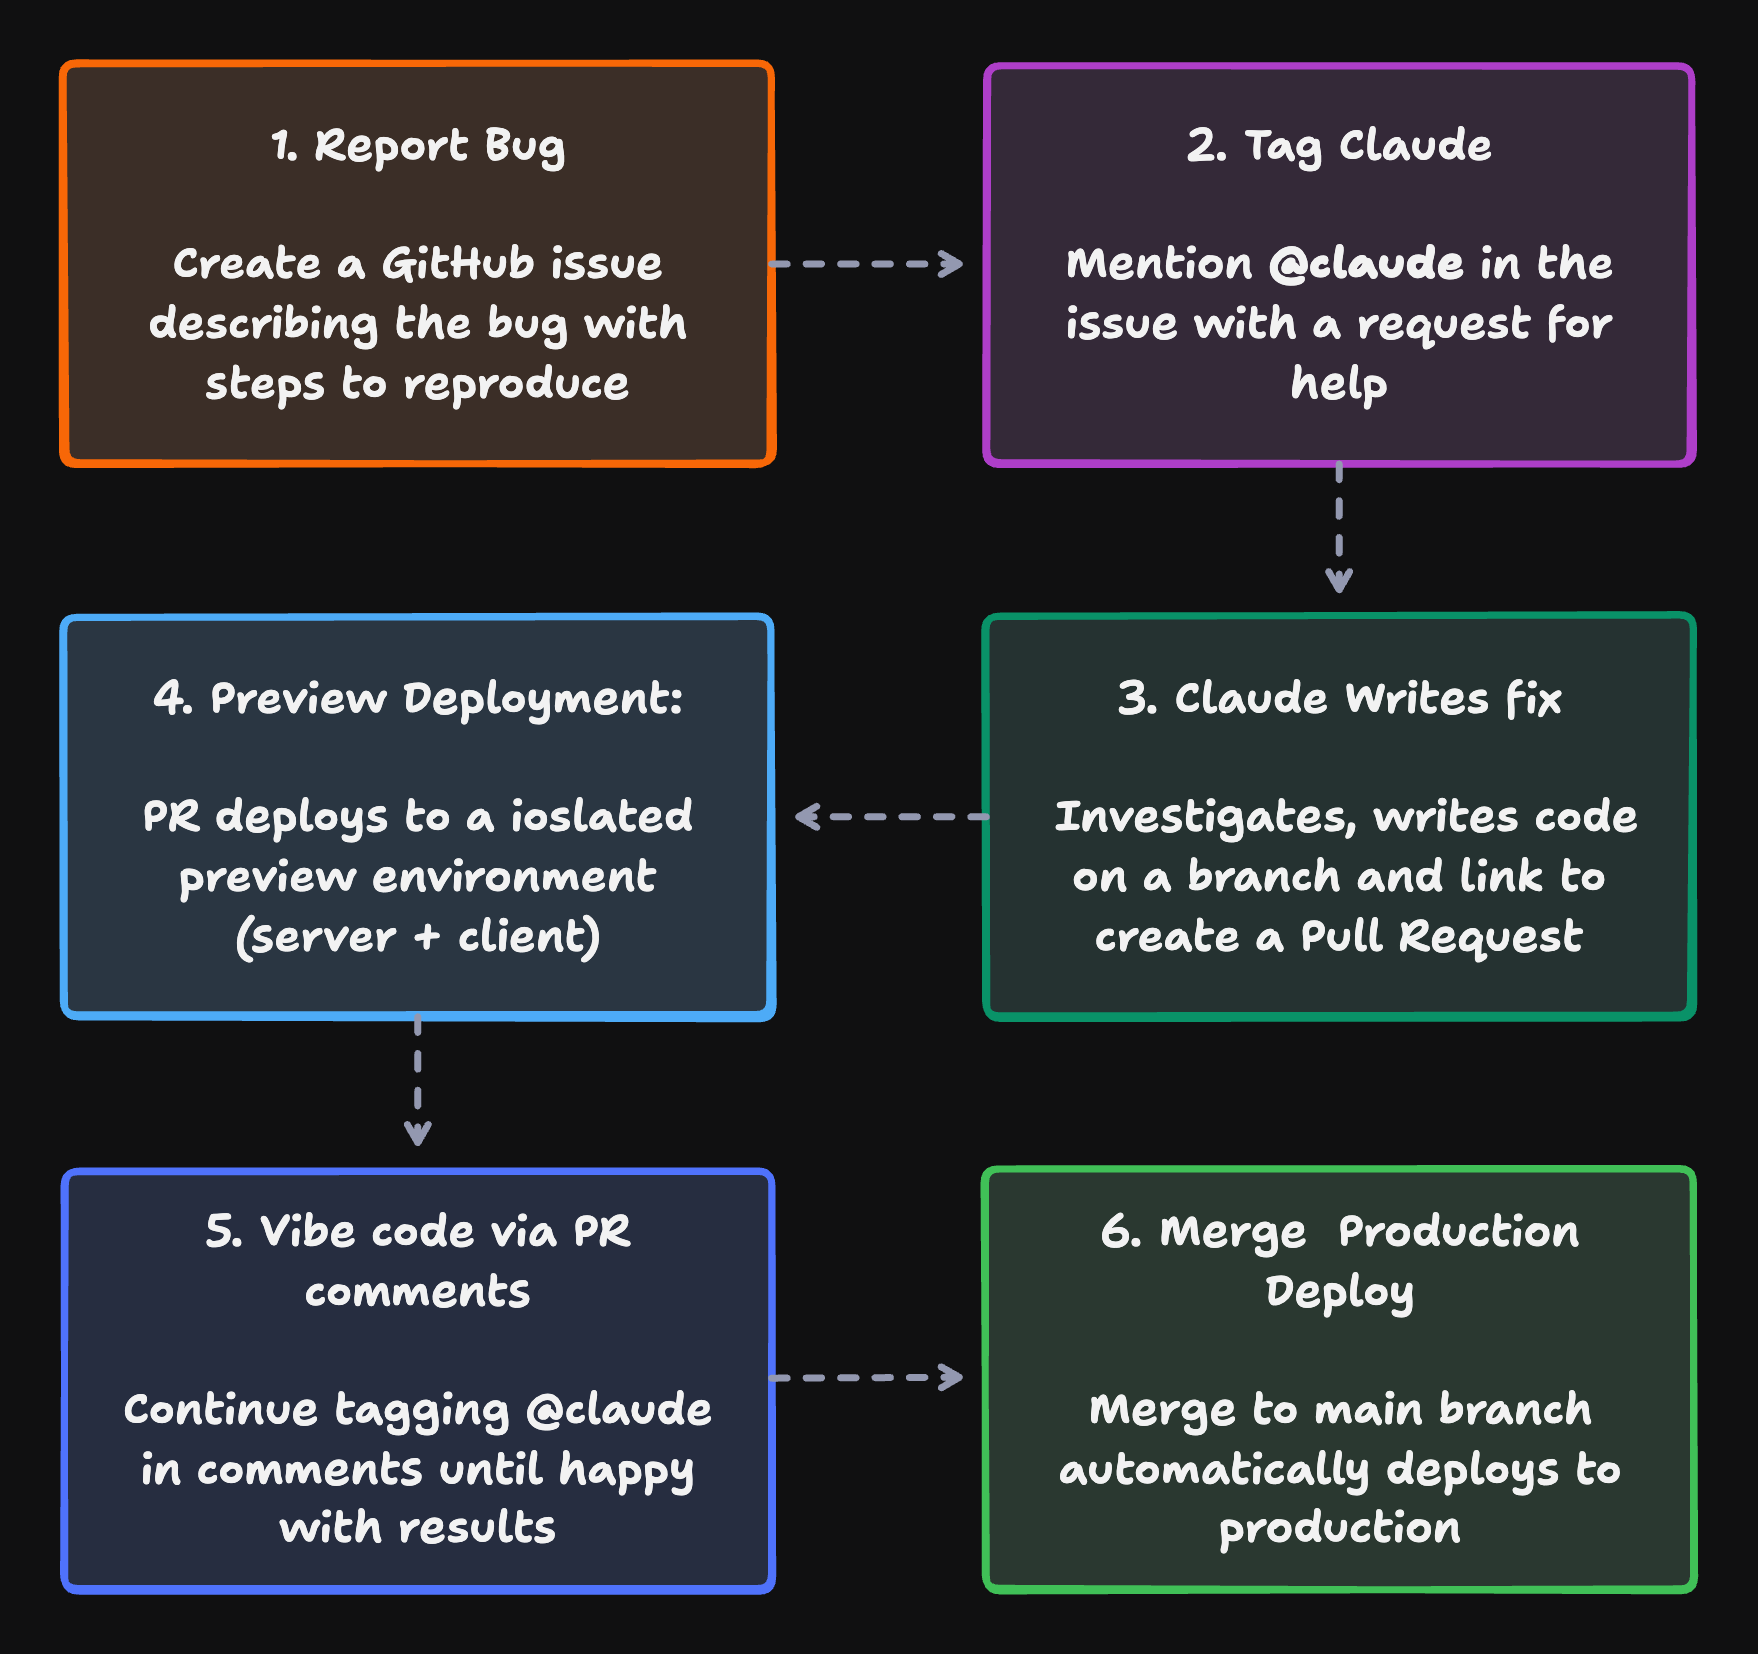
- Report a bug in a GitHub issue
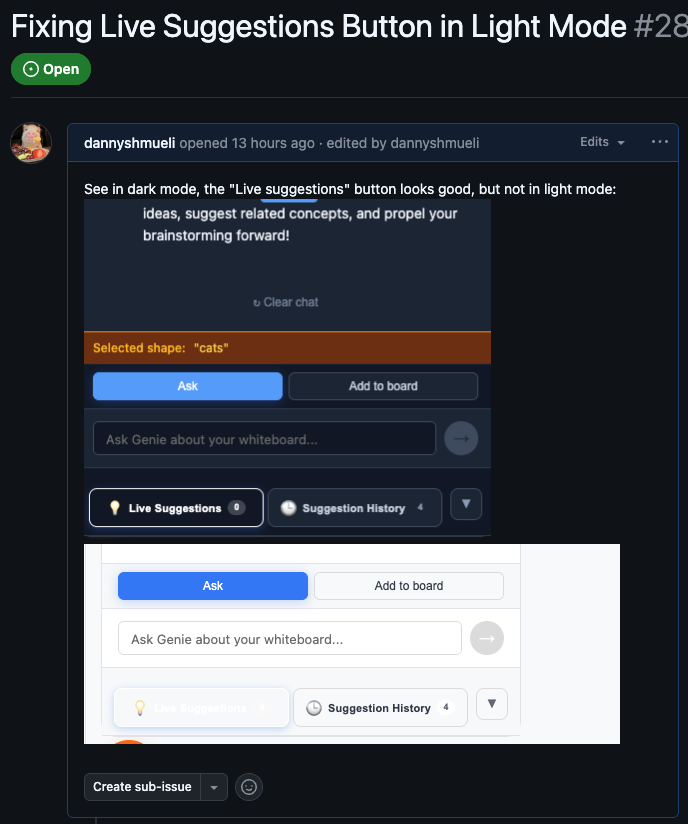
figure: bug in light mode - Tag
@claudein the issue (“@claude please help with this”) - Claude investigates, writes the fix on a branch and links to create PR
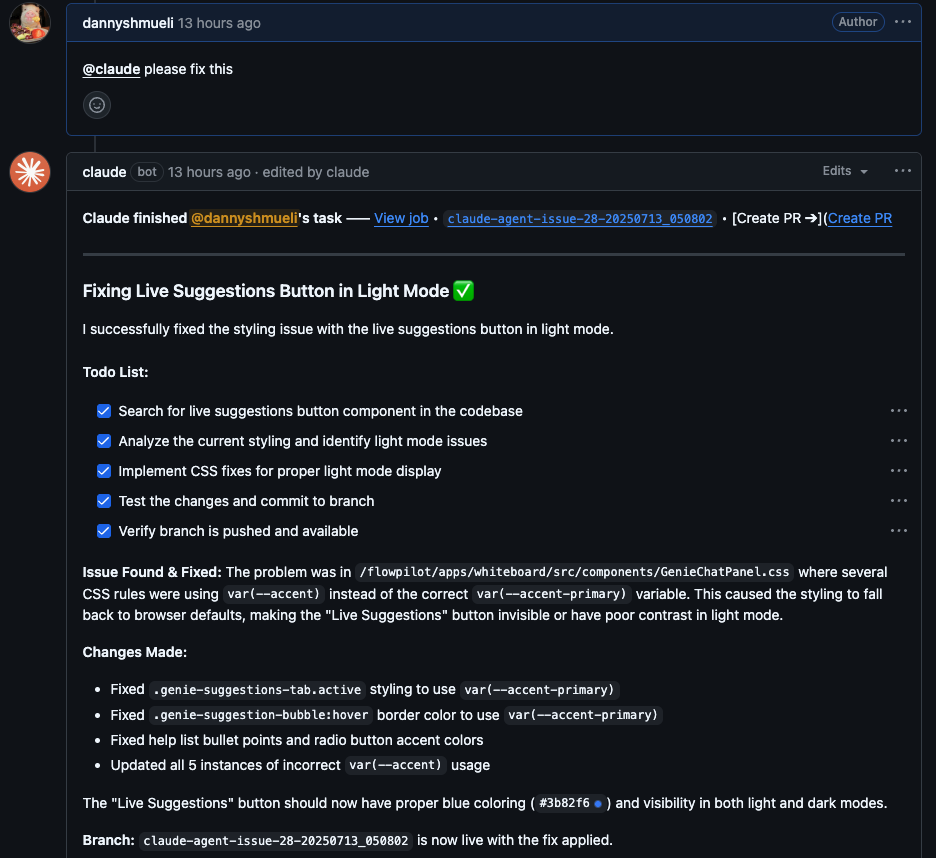
figure: Claude listens and responds with progress updates. - PR deploys it to a preview isolated environment (server + client)
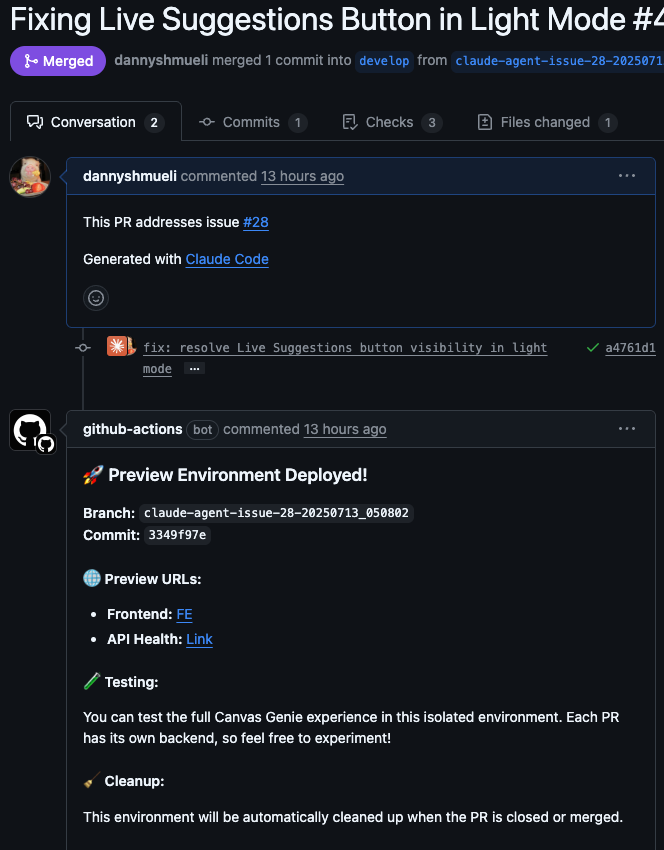
figure: no AI for this step, just Github actions. - Verify the fix and merge the PR
- Merge to main branch deploys to production automatically using Github actions.
Cost Overview: What You’ll Need
Before diving into the technical details, here’s the monthly cost breakdown:
Required Services:
- Cloudflare Workers: Free tier (100,000 requests/day)
- Cloudflare Pages: Free tier (500 builds/month)
- GitHub Actions: Free tier (2,000 minutes/month)
- Claude Pro/Max: $20-200/month
Total Monthly Cost: $20-200 (just for Claude subscription)
The free tiers are generous enough for most small to medium projects. You’ll only pay for Cloudflare if you exceed the limits.
The Product Manager’s Perspective
Why This Investment Made Sense
What’s the ROI? At 2-3 days of setup time, this investment pays for itself quickly:
- Velocity: Ship fixes in minutes, not hours
- Quality: Every change is tested in isolation
- Confidence: Preview before production in a production-like environment
- Scale: Handle multiple PRs simultaneously without resource conflicts
- Cost: Cloudflare Workers are practically free at my scale
The Real Impact
Since implementing this system:
- Bug fix time: From 2-3 hours to 15 minutes
- Deployment errors: Reduced by 90%
- Context switching: Eliminated for simple fixes
- Developer happiness: Through the roof
When Automation Pays Off
The break-even point was surprisingly quick:
- Setup time: ~12 hours
- Time saved per deployment: ~1 hour
- Deployments needed to break even: 12
- Actual deployment frequency: 12 per week
We hit ROI in about 1 week.
The Complete Flow: From Issue to Production
Prerequisites: Technical Knowledge Required
Before starting, you should be comfortable with:
- GitHub Actions and YAML syntax
- Basic command line operations
- Environment variables and API keys
- Git branching and pull requests
Prerequisites: The Foundation
Why These Tools?
- Cloudflare Workers: Serverless backend that scales globally without server management
- Cloudflare Pages: Static hosting with automatic preview deployments for every PR
- GitHub Actions: Automation workflows that respond to GitHub events
- Claude Code Action: AI agent that can read, write, and push code directly to GitHub
Tech Stack:
- Backend: Cloudflare Workers
- Frontend: Cloudflare Pages (static hosting with preview deployments)
- CI/CD: GitHub Actions (automation workflows)
- Package Manager: pnpm (monorepo support)
Required Accounts:
- GitHub account with Actions enabled
- Cloudflare account (free tier works)
- Claude Code OAuth token (Pro/Max Subscription) or Anthropic API key
Setting Up Cloudflare API Permissions
You’ll need a Cloudflare API token with specific permissions to deploy workers and pages automatically.
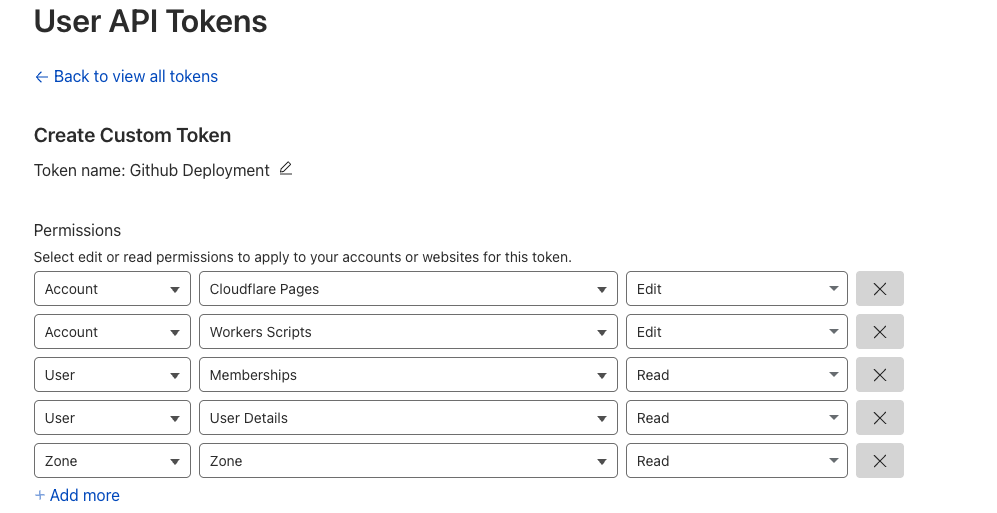
Required Permissions:
- Cloudflare Pages: Edit permissions (to deploy frontend previews)
- Workers Scripts: Edit permissions (to deploy backend services)
- User Details: Read permissions (for authentication)
Setup Claude Code in your Github Actions:
Follow the instructions from https://github.com/anthropics/claude-code-action
GitHub Actions Permissions
In your repository settings → Actions → General:
- Actions permissions: Allow all actions
- Workflow permissions: Read and write permissions
- Allow GitHub Actions to create and approve pull requests: ✓ Enabled
Required repository secrets:
CLAUDE_CODE_OAUTH_TOKEN: Your Claude Code OAuth tokenCLOUDFLARE_API_TOKEN: API token with Workers and Pages permissionsYOUR_APP_API_KEY_PRODUCTION: Your production API keysYOUR_APP_API_KEY_TEST: Test API keys for preview environments
Step-by-Step Workflow
Step 1: User Reports an Issue
A user creates a GitHub issue: “Live Suggestions Button in Light Mode looks bad” + adds screenshots
They simply add: “@claude can you fix this?”
Step 2: Claude Springs into Action
The GitHub Actions workflow detects the @claude mention and triggers the AI agent. This is where the magic begins - Claude analyzes the issue, examines the codebase, and creates a solution.
.github/workflows/claude.yml:
1 | |
⚠️ Critical Configuration: The custom_instructions field is essential! Without explicitly telling Claude to push to a branch, it might only commit changes within the GitHub Actions environment where they’re never accessible.
1 | |
Learn more about setting up Claude Code in GitHub Actions: Official Documentation
Step 3: Claude Fixes and Creates Branch
Claude analyzes the codebase, identifies the problem, and creates a fix. Then it pushes the fix to a new branch (e.g., claude-agent-issue-26) and comments on the issue with:
- branch link
- create PR link
This gives you full control - you can review the changes before creating the PR.
Example Workflow:
- Claude fixes issue #26, creates branch
claude-agent-issue-26 - You create PR from that branch
- You test and find issues
- Comment on PR: “@claude the button needs to be centered on mobile”
- Claude pushes new commits to the same branch
- PR automatically rebuilds
Why on PR: When Claude is triggered on a PR (not an issue), it always works on the existing PR branch. This means:
- First time: @claude on issue → creates new branch
- Subsequent times: @claude on PR → updates same branch
Step 4: Isolated Preview Environment
Here’s where the real power comes in. When you create a PR from Claude’s branch, the automated deployment system creates a completely isolated environment for testing.
Each PR gets its own complete environment through the pr-deploy.yml workflow:
- Deploys a branch-specific backend:
https://your-app-name-claude-agent-issue-26.cloudflareuser.workers.dev - Builds the frontend with the branch API: The client knows to talk to the branch backend
- Deploys to Cloudflare Pages:
https://claude-agent-issue-26.your-app-name.pages.dev - Comments on the PR with all the preview URLs
1 | |
Key Points:
- Use separate API keys for test (
YOUR_APP_API_KEY_TEST) vs production (YOUR_APP_API_KEY_PRODUCTION) - The frontend build gets the branch-specific API URL via environment variable
- This pattern works for any API service (OpenAI, Stripe, OpenRouter, etc.)
Result:
- Isolated backend with test API keys
- Frontend configured to use the branch backend
- No interference with production or other PRs
- Full end-to-end testing capability
Step 5: Review and Test
With the preview environment ready, you can now test the fix in a production-like environment. The PR comment includes direct links to both the frontend and backend, making it easy to verify the changes work as expected.
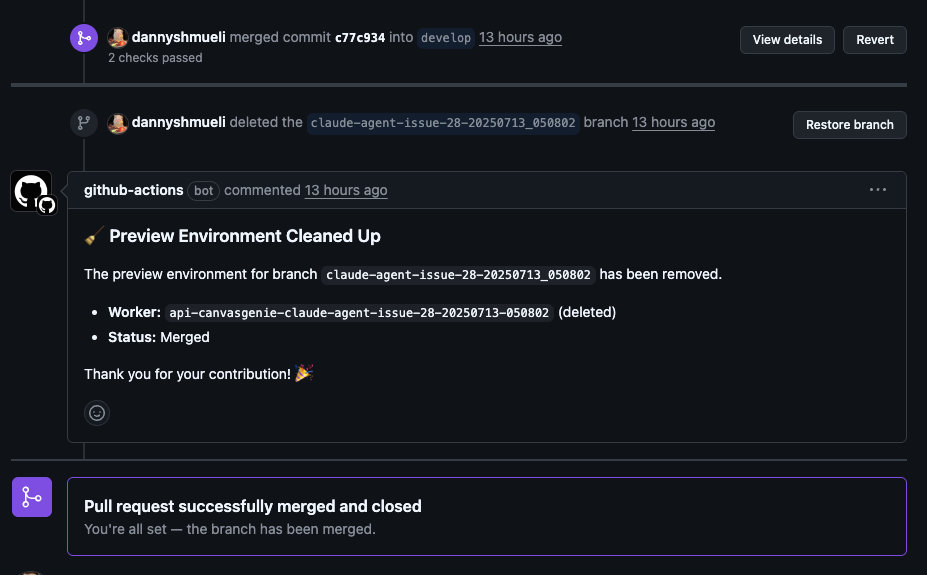
Step 6: Automatic Cleanup
When the PR is merged or closed, pr-cleanup.yml automatically:
- Deletes the branch-specific worker
- Updates deployment status
- Posts a cleanup confirmation
No more forgotten test environments eating up resources!
1 | |
Step 7: Production Deployment
Merging to the main branch triggers the production deployment:
- Backend deploys to
myproject.myusername.workers.dev - Frontend deploys to
www.myapp.com - All with zero manual intervention
Implementation Details
Branch Name Sanitization
Cloudflare has strict naming requirements, so I sanitize branch names:
1 | |
This turns feature/ADD-NEW-API!!! into feature-add-new-api.
Environment Isolation
Each environment uses different API keys:
- Production:
OPENROUTER_API_KEY_PRODUCTION - PR Previews:
OPENROUTER_API_KEY_TEST - Local Dev:
OPENROUTER_API_KEY
This prevents test environments from affecting production quotas or data.
Challenges and Solutions
- CORS configuration: Branch preview URLs need special handling
- Secret management: Different keys for different environments
- Cleanup automation: Ensuring resources are properly removed
- Iteration workflow: Remember to use PR comments (not issue comments) for continued work on the same branch
Check out Canvas Genie. Have questions? Find me on X